
In graduate school, I was a board gamer. I spent many a happy Friday afternoon racing for the galaxy or building a power grid or terraforming a planet. I won more than my fair share of these outings, which contented me with the hobby until I realized it wasn’t any particular game I was good at, but the game of learning new games. Someone would introduce a new game to our group, and it was a race to decipher the latent resources, constraints, and trade-offs behind the art’s syntactic sugar. We played ad nauseam until the moment someone introduced the next game, whence the old one fell off the Earth. This game-learning game seemed to me less interesting than an actual game, at least a worthy one, so I looked for a classic to study seriously. As a mathematician with no patience for memorization (ruling out chess), I settled on bridge.
What follows is just the tiniest tidbit of tactical analysis to whet the appetite of any longtime board gamers tiring of the tabletop treadmill. It is called the principle of restricted choice. We start with a very quick description of the structure of bridge—feel free to skip the next paragraph if you’re familiar.
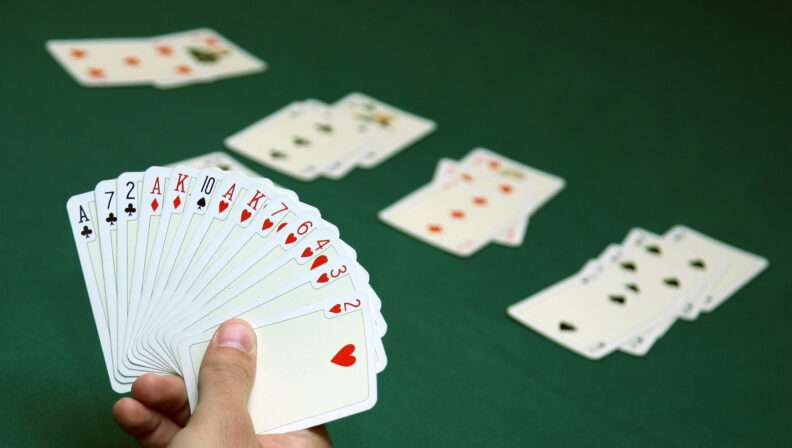
Bridge is a trick-taking game, in the same family as Euchre, Hearts, and Spades, played with a standard deck of 52 cards dealt out completely among four players. Each player is on a team with the player sitting opposite. Both pairs want to win as many of the 13 tricks as possible, but one pair, the declaring side, enjoys a big jump in payoff if it takes at least some number N≥7 tricks; the defenders want to stop them. There is sometimes a trump suit, which, along with N, is determined in a structured negotiation called the auction before any cards are played. One more crucial point—and one of the quirks that makes bridge so strategically deep: after the auction and the opening lead, one player on the declaring side lays his hand face up on the table. That player—the dummy—makes no decisions for the rest of the deal. Whenever it is his turn to play a card, it is chosen by his partner, the declarer.
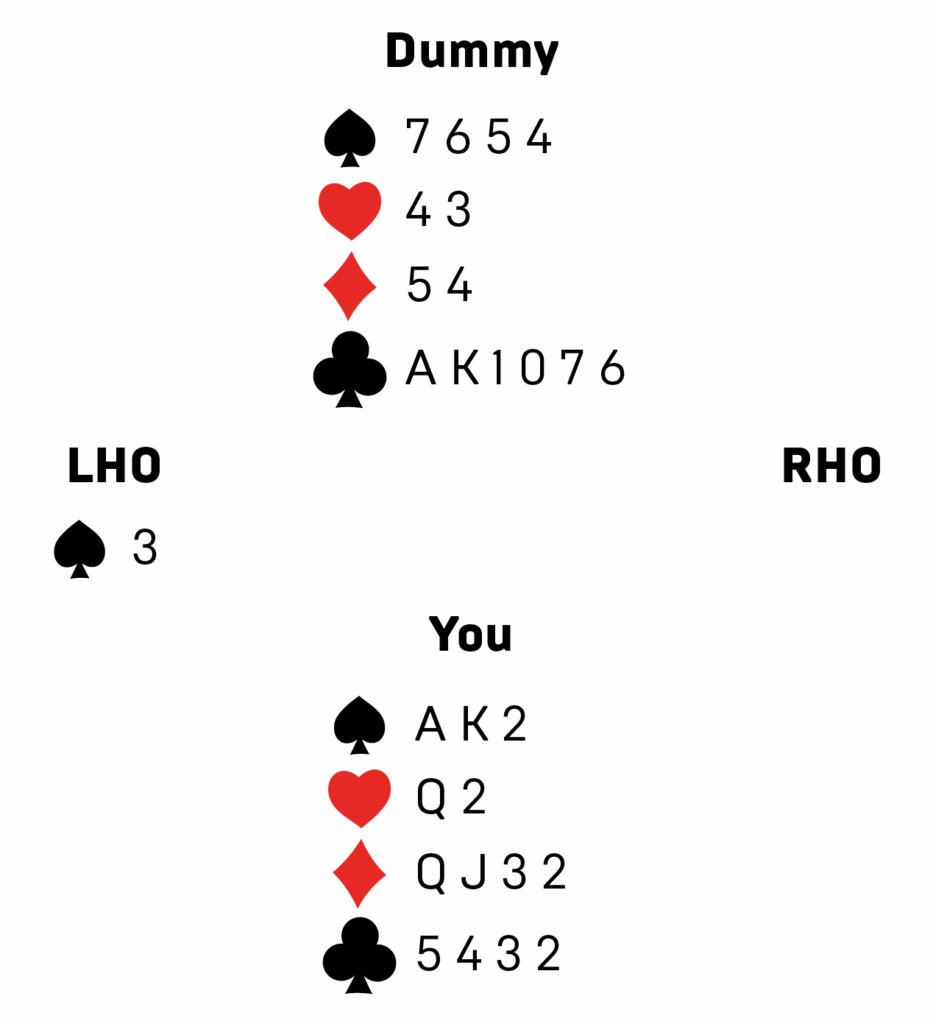
Now suppose you hold ♠️AK2 ♥️Q2 ♦️QJ32 ♣️5432, and you find yourself as declarer with no trump suit and N=7. Your left-hand opponent (LHO) leads the ♠️3, and dummy hits the table with ♠️7654 ♥️43 ♦️54 ♣️AK1076. Remember, you are controlling both of your side’s hands and you want to take seven tricks. What do you notice?
The first thing to notice is that you got lucky on the opening lead. On a red suit lead, the defenders could take at least two diamonds and five hearts before ever giving up control—enough to put you down. (Why five hearts? They have the ♥️AK between them, which will capture your ♥️Q, and one of them has at least five, which will all win tricks once both you and dummy are out of the suit.)
The second thing to notice is that you’d prefer to be playing with clubs as trump, holding nine of them together with dummy, to avoid the heartless catastrophe above. By the same token, your opponents would have done well to compete more aggressively in the auction, bidding for hearts as trump, holding most of the deck’s high cards and nine of the hearts. But here you are, sights set on seven tricks, and the rest is water under the… bridge.
And you have to take your tricks without losing the lead, because the moment you lose control, the defense can rattle off seven red suit tricks. After winning the opening spade lead in hand, your only hope is to play the club suit for five tricks. How should you do that?
There is the naive strategy of playing clubs from the top. This strategy succeeds exactly when the defenders’ collective club holding of ♣️QJ98 is divided 2-2 between them (LHO-RHO), because in exactly those cases, all four defending clubs will fall under dummy’s ♣️AK. On the other hand, if the defending clubs split 4-0, 0-4, or 1-3, you cannot succeed via any line of play (proof: exercise), so winning to all 2-2 splits ain’t bad. But can you do better? Can you win to any of the 3-1 splits? (Hint: there’s a reason I gave dummy the ♣️10!)
It turns out there is a subtler line that uses the defenders’ plays to the first club trick to decide how to play the second club trick. In this line, our default plan is the naive one—play the A and then the K—unless something surprising happens on the first round of clubs, in which case do something else. This will let us pick up two (of the four) 3-1 splits in exchange for one (of the six) 2-2 splits, making the subtler line slightly better a priori, and much better—nearly twice as good—conditioned on “something surprising.”
Let’s illustrate by continuing the play where we left off. You just won the opening ♠️3 lead in hand with the ♠️A or K. You lead any club from hand, LHO follows with one of the missing low clubs (say the 9), you call for the A from dummy, and RHO contributes the other low club. You didn’t get much information here. These defensive plays are consistent with many original holdings: Q9-J8, J9-Q8, QJ9-8, 9-QJ8. You can only possibly win to the first two, so proceed with your default plan: lay down the ♣️K and hope both defenders follow suit.
Now imagine the first club trick went differently: ♣️5, ♣️9, ♣️A, ♣️Q! Wake-up call! This says a lot! Ignoring irrelevant splits (i.e. ignoring that RHO might be trolling us by playing the Q from QJ8, knowing he’s got us regardless), these plays are only consistent with J98-Q and 98-QJ1. Ok, you say, but how does that help us? Here’s the key insight: holding QJ, RHO might just as well have played the J! So the cards we saw, 9-Q, come from (a) every universe of J98-Q, and (b) about half the universes of 98-QJ (we should assume2; cf. Exercise 4). Case (a), that RHO’s choice of play was restricted, is twice3 as likely!
Having thought this through, we can plan the second club trick to cater to our theory that LHO holds both remaining clubs, J8. We lead a spade from dummy and win in hand with our remaining spade honor—this step is critical, to return the lead to our hand.4 Finally we lead a club from hand, planning to cover whatever LHO plays as cheaply as possible in dummy (this means: if LHO plays the 8, we call for the 10 from dummy; if LHO plays the J, we call for the K). LHO follows with the 8, as expected, giving us the opportunity to err. We grit our teeth and call for the 10, knowing full well this could be fatal if RHO started with QJ—and our naive plan would have worked! When RHO discards any non-club, we breathe a sigh of relief, drop LHO’s ♣️J with dummy’s ♣️K, run the rest of the clubs, take seven tricks, and pat ourselves on the back for remembering the principle of restricted choice.
1 RHO would not play the Q from Q8—he doesn’t know we plan to play the K next.
2 Before the game, RHO picked some probability q to play the Q from QJ, if ever faced with the choice.
3 “Twice” is actually a slight lie, even assuming RHO randomizes perfectly from QJ.
4 Observe it would have been fatal to cash our second spade honor before playing a round of clubs!
Exercises
We claimed the restricted choice line gives up one 2-2 club split, namely 98-QJ, in exchange for two 3-1 splits. One of those is J98-Q, as we saw. What is the other?
Click to reveal
Supply the proof that no line wins to any 4-0, 0-4, or 1-3 splits.
Click to reveal
Footnote 1 seems in conflict with our default plan, which was to play the ♣️K next upon seeing ♣️5, ♣️low, ♣️A, ♣️low. When (from RHO’s perspective) would it be reasonable for us not to play the ♣️K next, if he follows low?
Click to reveal
Show that the optimal q of footnote 2 is 1/2.
Click to reveal
Explain footnote 3.
Click to reveal
Imagine that on the first round of clubs it is LHO, not RHO, who follows with a royal: say ♣️5, ♣️J, ♣️A, ♣️9. Do we not have the same inference as above? Why didn’t we discuss that case? Would LHO ever play the ♣️J from ♣️J8 or ♣️QJ8?
Click to reveal
What is the best line of play if dummy’s holding is instead ♣️AQ1076?
Click to reveal
Related Posts
 Balanced Play in Social Deduction Board ek999You’ve been carefully observing the actions of the players around you, knowing full-well that they might not be who they claim. No, you’re not a character in John Carpenter’s “The Thing,” or stuck at a speed-dating event. You are playing “The Resistance: Avalon,” a social deduction board […]
 On Trading ek999We talk a lot on this site about how various games are related to trading. Poker is our favorite example, but we’ve also mentioned Agricola, Magic: The Gathering, fantasy drafting, and even video games. One may notice, however, that we’ve never mentioned a board game that involves […]
 Round 1: Cards are War, in Disguise of a SportThis year’s poker tournament began deliciously, with an ample supply of thin-crust – “I’m practically salad” – pizza. We found our seats and enthusiastically prepared to take as many blinds from the latecomers as possible. I played tight for a while to get a feel for […]
Subscribe Now
Get each new post sent straight to your inbox
https://shorturl.fm/UuRZt
https://shorturl.fm/tbx9w
https://shorturl.fm/p7WbQ
https://shorturl.fm/QERr5
https://shorturl.fm/eQETL
https://shorturl.fm/MhrIR
https://shorturl.fm/kkWBx
https://shorturl.fm/troTd
https://shorturl.fm/wnrtA
https://shorturl.fm/PgRGv
https://shorturl.fm/iQ8wI
https://shorturl.fm/AWscZ
https://shorturl.fm/E82ZF
https://shorturl.fm/hmKhp
https://shorturl.fm/ShB1U
https://shorturl.fm/ZyKjx
https://shorturl.fm/c1QrO
https://shorturl.fm/EtoDi
https://shorturl.fm/6Z7w4
https://shorturl.fm/uV4NE
https://shorturl.fm/3dd7V
https://shorturl.fm/W9h9z
https://shorturl.fm/jUFew
https://shorturl.fm/hNEDU
https://shorturl.fm/FhPoA
https://shorturl.fm/ftBe6
https://shorturl.fm/0IyZF
https://shorturl.fm/eo6n1
https://shorturl.fm/i0yZX
https://shorturl.fm/SySjD
https://shorturl.fm/cnVmJ
https://shorturl.fm/uasKm
https://shorturl.fm/ZSDxj
https://shorturl.fm/sqRr6
https://shorturl.fm/nCMaA
https://shorturl.fm/Wyk5C
https://shorturl.fm/nvp3x
https://shorturl.fm/SCoaU
https://shorturl.fm/JzQNx
https://shorturl.fm/8bBSI
https://shorturl.fm/R2Iwn
https://shorturl.fm/0LjIg
https://shorturl.fm/EAfaN
https://shorturl.fm/hcEkP
https://shorturl.fm/jBVau
https://shorturl.fm/Sky5o
https://shorturl.fm/iUwZ7
https://shorturl.fm/9qPBD
https://shorturl.fm/DWqsm
https://shorturl.fm/d3T96
https://shorturl.fm/UgbY1
https://shorturl.fm/4fsOf
https://shorturl.fm/8uKcg
https://shorturl.fm/OnuYe
https://shorturl.fm/4pmhi
https://shorturl.fm/WORIj
https://shorturl.fm/VKshX
https://shorturl.fm/mU9xf
https://shorturl.fm/WLctJ
https://shorturl.fm/0h9Tx
https://shorturl.fm/EwADT
https://shorturl.fm/mmUBU
https://shorturl.fm/yxgxK
https://shorturl.fm/eZFl6
https://shorturl.fm/o8c37
https://shorturl.fm/omQ07
https://shorturl.fm/pNX2C
https://shorturl.fm/8i6d0
https://shorturl.fm/YodNy
https://shorturl.fm/j7IQh
https://shorturl.fm/qeWWj
https://shorturl.fm/4M1tv
https://shorturl.fm/XQ5i1
https://shorturl.fm/G7Lzr
https://shorturl.fm/3nTew
https://shorturl.fm/FdqsD
https://shorturl.fm/Iz5eo
https://shorturl.fm/EGT8s
https://shorturl.fm/InhAU
https://shorturl.fm/RhH4h
https://shorturl.fm/8icj9
https://shorturl.fm/ohcse
https://shorturl.fm/6YLQx
https://shorturl.fm/3eqyn
https://shorturl.fm/sxY8X
https://shorturl.fm/LdUAo
https://shorturl.fm/F4aSr
https://shorturl.fm/FDv4r
https://shorturl.fm/KemV7
https://shorturl.fm/gX7I3
https://shorturl.fm/aJpdl
https://shorturl.fm/cSAxu
https://shorturl.fm/xkTVD
https://shorturl.fm/1lmmp
https://shorturl.fm/sxv2y
https://shorturl.fm/vOvRm
https://shorturl.fm/SdPYh
https://shorturl.fm/zAlzB
https://shorturl.fm/5lQKi
https://shorturl.fm/3deNo
https://shorturl.fm/adqae
https://shorturl.fm/vwZTI
https://shorturl.fm/k1IOT
https://shorturl.fm/bSaIP
https://shorturl.fm/9uZOa
https://shorturl.fm/c57ZR
https://shorturl.fm/waZvQ
https://shorturl.fm/woWRF
https://shorturl.fm/yU0PP
https://shorturl.fm/fYD9K
https://shorturl.fm/3FEsf
https://shorturl.fm/v6FE4
https://shorturl.fm/aDhTA
https://shorturl.fm/1KagD
https://shorturl.fm/fvdWU
https://shorturl.fm/az1G8
https://shorturl.fm/u2G2n
https://shorturl.fm/98QSm
https://shorturl.fm/vtm2B
https://shorturl.fm/9NJ8A
https://shorturl.fm/b1vQY
https://shorturl.fm/ltPSJ
https://shorturl.fm/XFytt
https://shorturl.fm/fuYt7
https://shorturl.fm/TbJpy
https://shorturl.fm/5NP7o
https://shorturl.fm/NFvKG
https://shorturl.fm/vxbLW
https://shorturl.fm/RurPz
https://shorturl.fm/Us5GM
https://shorturl.fm/qdwSR
https://shorturl.fm/jAF6E
https://shorturl.fm/optFY
https://shorturl.fm/HTfwL
https://shorturl.fm/zzVm0
https://shorturl.fm/CrqVV
https://shorturl.fm/tZeb8
https://shorturl.fm/njdWi
https://shorturl.fm/FeNIQ
https://shorturl.fm/wZqTR
https://shorturl.fm/VdWXr
https://shorturl.fm/Rh8qX
https://shorturl.fm/FMQzq
https://shorturl.fm/fVQNt
https://shorturl.fm/ukQjS
https://shorturl.fm/dPbq5
https://shorturl.fm/ndoVU
https://shorturl.fm/ibndC
https://shorturl.fm/CihQo
https://shorturl.fm/faG5m
https://shorturl.fm/aZ4Ck
https://shorturl.fm/75mXN
https://shorturl.fm/lWdxM
https://shorturl.fm/v3pve
https://shorturl.fm/Pbhvv
https://shorturl.fm/kJSxz
https://shorturl.fm/7UnPj
https://shorturl.fm/F0Egl
https://shorturl.fm/SR0KE
https://shorturl.fm/wFBMh
https://shorturl.fm/ozyPL
https://shorturl.fm/AUrvK
https://shorturl.fm/6EvYp
https://shorturl.fm/LQZdg
https://shorturl.fm/qg3LD
https://shorturl.fm/HpCZe
https://shorturl.fm/bIC4v
https://shorturl.fm/DhGIt
https://shorturl.fm/fa2VO
https://shorturl.fm/wXbeh
https://shorturl.fm/HRDPg
https://shorturl.fm/5kUoT
https://shorturl.fm/We9wt
https://shorturl.fm/lzZVY
https://shorturl.fm/qtoiM
https://shorturl.fm/Ftutx
https://shorturl.fm/t48lQ
https://shorturl.fm/g2hI7
https://shorturl.fm/ynnQH
https://shorturl.fm/tyf4M
https://shorturl.fm/6dqDR
https://shorturl.fm/HtRsC
https://shorturl.fm/e02C6
https://shorturl.fm/q2ewV
https://shorturl.fm/6V10V
https://shorturl.fm/bOP68
https://shorturl.fm/Nl4s6
https://shorturl.fm/wMWju
https://shorturl.fm/eBI6K
https://shorturl.fm/oxyhk
https://shorturl.fm/Tzb7y
https://shorturl.fm/T1JYc
https://shorturl.fm/3LDtF
https://shorturl.fm/Pg9X1
https://shorturl.fm/AHp81
https://shorturl.fm/2qaAJ
https://shorturl.fm/TiCJn
https://shorturl.fm/b3g9u
https://shorturl.fm/zQDtj
https://shorturl.fm/jk8V7
https://shorturl.fm/ZNyLC
https://shorturl.fm/0dqs9
https://shorturl.fm/vj8ds
https://shorturl.fm/4Qqpv
https://shorturl.fm/sm81w
https://shorturl.fm/gCfXc
https://shorturl.fm/FQt4H
https://shorturl.fm/uqk8p
https://shorturl.fm/lLJ2V
https://shorturl.fm/rY56x
https://shorturl.fm/Rzq8K
https://shorturl.fm/9Wn7X
https://shorturl.fm/SmluN
https://shorturl.fm/K0PTL
https://shorturl.fm/x3WrG
https://shorturl.fm/vzg5I
https://shorturl.fm/4qN1l
https://shorturl.fm/m95i4
https://shorturl.fm/VBquL
https://shorturl.fm/AFQVo
https://shorturl.fm/Qz3FX
https://shorturl.fm/JtZyT
https://shorturl.fm/maAo8
https://shorturl.fm/P26JE